
Spring Boot Starter配置spring.factories的自动生成神器:mica-auto
spring.factories要被弃用了?
如果你是Spring Boot用户的话,一定有这样的开发体验,当我们要引入某个功能的时候,只需要在maven或gradle的配置中直接引入对应的Starter,马上就可以使用了,而不需要像传统Spring应用那样写个xml或java配置类来初始化各种Bean。
如果你有探索过这些Starter的原理,那你一定知道Spring Boot并没有消灭这些原本你要配置的Bean,而是将这些Bean做成了一些默认的配置类,同时利用/META-INF/spring.factories这个文件来指定要加载的默认配置。
这样当Spring Boot应用启动的时候,就会根据引入的各种Starter中的/META-INF/spring.factories文件所指定的配置类去加载Bean。
而这次刚发布的Spring Boot 2.7中,有一个不推荐使用的内容就是关于这个/META-INF/spring.factories文件的,所以对于有自定义Starter的开发者来说,有时间要抓紧把这一变化改起来了,因为在Spring Boot 3开始将移除对/META-INF/spring.factories的支持。

那么具体怎么改呢?
下面以一个自己编写的starter为例,它的/META-INF/spring.factories内容是这样的:
1 | org.springframework.boot.autoconfigure.EnableAutoConfiguration=\ |
我们只需要创建一个新的文件:/META-INF/spring/org.springframework.boot.autoconfigure.AutoConfiguration.imports,内容的话只需要直接放配置类就可以了,比如这样:
1 | com.itjing.xxx.XxxAutoConfiguration |
注意:这里多了一级spring目录。
mica-auto
前言
有人觉得上面的方式还没有原来好呢,要维护两个文件,太麻烦了。
为了解决维护麻烦的问题,这里要给大家推荐一个开源项目:mica-auto。
不要看Star不多,DD用下来感觉还是非常好的。
GitHub地址:点我跳转
原理
mica auto 采用 Annotation Processor,她不是什么新技术,在 jdk 1.6 就存在了。 Annotation Processor 是 javac 的一个工具,它用来在编译时扫描和处理注解。通过 Annotation Processor 可以获取到注解和被注解对象的相关信息,然后根据注解自动生成Java代码,省去了手动编写,提高了编码效率。大名鼎鼎的 Lombok 也是采用的该技术。
该项目的实现原理与Lombok类似,利用Java 6就开始支持的Annotation Processor,在编译期扫描注解和处理注解。
使用场景
主要是用来避免 Spring boot 主项目包同 子项目或者子模块 包不一致,避免包扫描不到的问题。
- 自定义
spring boot starter。 - 多模块项目中的
子项目(不建议主项目添加mica-auto)。
功能
- 自动生成
spring.factories、spring-devtools.properties配置(Spring boot starter 开发利器)。 - 生成
FeignClient到spring.factories中,供 mica-cloud 中完成 Feign 自动化配置。 - 生成
java spi配置,需要添加@AutoService注解。
版本说明
目前最新的 2.3.x 版本也支持 Spring Boot 2.7 之后推荐使用的org.springframework.boot.autoconfigure.AutoConfiguration.imports配置文件的自动生成。
| version | spring boot version | java version |
|---|---|---|
| 3.0.1 | 3.x | 17 |
| 2.3.2 | 1.x ~ 3.x | 1.8 |
| 注解 | spring.factories 或 Spi key |
|---|---|
| @AutoContextInitializer | ApplicationContextInitializer |
| @AutoListener | ApplicationListener |
| @AutoRunListener | SpringApplicationRunListener |
| @AutoEnvPostProcessor | EnvironmentPostProcessor |
| @AutoFailureAnalyzer | FailureAnalyzer |
| @AutoConfigImportFilter | AutoConfigurationImportFilter |
| @AutoTemplateProvider | TemplateAvailabilityProvider |
| @AutoEnableCircuitBreaker | EnableCircuitBreaker |
| @AutoConfigDataLocationResolver | ConfigDataLocationResolver |
| @AutoConfigDataLoader | ConfigDataLoader |
| @AutoDatabaseInitializerDetector | DatabaseInitializerDetector |
| @AutoDependsOnDatabaseInitializationDetector | DependsOnDatabaseInitializationDetector |
| @Component | EnableAutoConfiguration |
| @AutoIgnore | 忽略,不生成到 spring.factories |
| @AutoService | java Spi 生成配置 |
| 注解 | aot.factories |
|---|---|
| @AotRuntimeHintsRegistrar | RuntimeHintsRegistrar |
| @AotBeanRegistration | BeanRegistrationAotProcessor |
| @AotBeanFactoryInitialization | BeanFactoryInitializationAotProcessor |
原理
扫描 @Component,自动生成相应的配置,支持组合注解。
使用
注意: 如果你项目中使用了 Lombok 请将 mica-auto 的依赖放置到 Lombok 后面。
maven
1 | <dependency> |
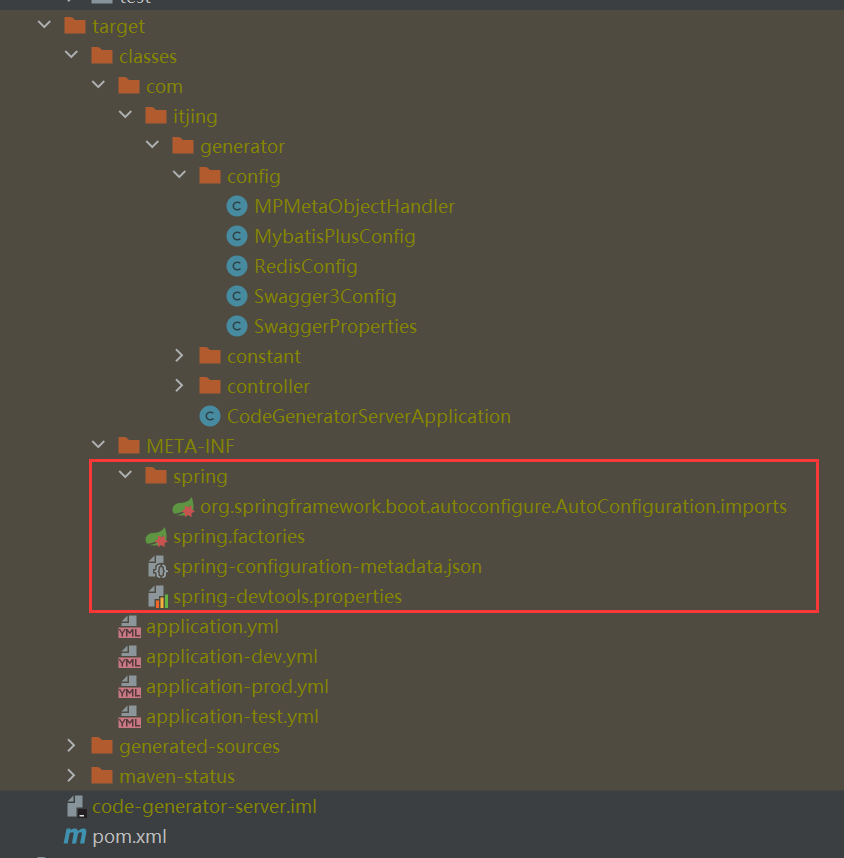
编译后,马上就可以看到文件生成成功了
spring-configuration-metadata.json
是啥?
这个文件也是位于/META-INF/目录下面:
里面大概是这样的:
1 | { |
spring.factories的作用是让Spring Boot知道要加载这个Starter的哪些配置类,而这个文件又有啥用呢?
其实,这个内容是配置元数据的。
它的主要作用就是,当我们在配置文件中尝试编写配置信息的时候,IDE可以根据这个配置元数据给出了相关的提示信息。
所以,要做一个体验良好的Starter,这个文件还是非常重要的,对于使用你封装的开发者来说,写配置的时候就会方便很多。
如何自动生成?
既然spring.factories可以自动生成,那么spring-configuration-metadata.json文件可以自动生成吗?
答案是肯定的,不然维护这个json文件都会累死人!
你只需要在你的pom.xml中加入这个依赖:
1 | <dependency> |
一切就都搞定了,当你再次编译的时候,spring-configuration-metadata.json文件就自动出现啦!
不过,这里还有个前提,你在写配置属性类的时候,有好好写文档注释,那么自动提示就都会带上了,比如下面这样:
1 |
|